Monday, July 18, 2022


June - At Home on the Range 

The stove is a model 8-20D  Riverside, blue porcelain, manufactured by Rock Island Stove Company,  Rock Island,  Illinois. It features a hot water reservoir on the right and a warming oven on the top. 


    Back in April of this year, my friend Scott Johnson of the Low Technology Institute taught a workshop on refurbishing old tools at Schumacher Farm Park.  While he was there, someone affiliated with the park inquired whether he knew of anyone who knew how to cook on a wood cookstove.  Scott mentioned me.  I called them, and after tossing around a few ideas here and there, we had two workshops set up, one in June and one in October.  


    Schumacher Farm Park is a small historical museum in Waunakee, Wisconsin, just north of Madison. The farm sits on a small rise overlooking the fields below it.   It was the childhood home of Marcella Schumacher.  Marcella's father, Henry Schumacher, built the house for his new bride in 1906 for only $5,000. As an adult, Marcella left the area for some years but then returned and  lived in her family home until her death at the age of 83.   She created the Friends of Schumacher Farm to preserve the house and farm as an historic site after her death.      
                                                                                     
    The house has been restored to how it would have looked about 1920, with four bedrooms, a large parlor and dining room.


The dining room sits eight comfortably.                                                                 The beautiful parlor stove would have burned coal.

    The house also boasts a nice-sized kitchen complete with the wood cookstove shown above, a sink with working taps (both hot and cold, what luxury!),  a dry sink, a Hoosier cabinet, and the latest gadget: an electric refrigerator. Based on the design alone, I imagine this  last probably didn't arrive until 1930 or so.


The dry sink, a Victorian leftover but still useful                      The refrigerator was a huge step up from the Victorian icebox.

    The weather had vacillated wildly between cool and blazing hot in the weeks just before the workshop.  There was a nice flow-through of air from the front door to the kitchen and out the back windows of the house, but slaving over a hot stove on a stifling June day is only for the seasoned, dedicated, and desperate.  I love cooking on a wood cookstove, but the very idea of cooking during July and August makes me feel faint.  Still, women did it every day, freezing cold or blazing hot outside, up to three times a day, though most of the heavy cooking and baking in the summer was done in the morning before the heat of the day, and dinner and supper would be lighter foods eaten at room temperature or cooled in the icebox or the refrigerator once that newfangled appliance arrived on the scene.  Those women were of much stronger stock than I am.  My own stove, Milly, hasn't been fired up since it got up to 80 degrees consistently.  I hoped for moderate summer weather for the workshop.  If it wasn't, we'd cook more than just food.

    I wanted to test the stove before the day of the workshop, so I tootled out to the farm the weekend prior.  Good thing I did, too.  Each wood cookstove works differently, and the drafts and dampers on this one worked completely differently than my own cookstove at home: this one was built in 1920 in Illinois, and mine was built in 2018 in Italy.  I had brought Woodstove Cookery: At Home on the Range by Jane Cooper with me, for which I was immediately grateful.  This book is for people who want to install a wood cookstove, usually antique, in a modern home and includes everything you need to know about antique stoves.  Without it I would have been flummoxed.   

    This stove had burned both wood and coal, which would have been handy, but the firebox, the place where you put the wood in the stove, was only a third the size of the one in Milly.  This meant that the size of wood had to be pretty small - that's a lot of chopping - and wood had to be added frequently to keep the fire burning.  Coal would have been far preferable.  In addition, there was a sizable crack in the wall of the stove.  This didn't affect the stove when the park demonstrators wanted to burn a fire for show, but it did affect how the oven worked.  

    And there were three things the people at the farm hadn't thought of: matches (I had brought my own, just in case), kindling, and some paper to put under the kindling to light the fire.  When a kitchen like this is just set up for visitors to look at, rather than to function, things like this tend to get overlooked.  It had rained the night before, and I scoured under the trees for something that wasn't waterlogged to start the fire with.  I didn't come up with much - a few sorry branches that weren't quite as soaked as the rest was all I got for my trouble.  As for the paper, I tore sheets out of my notebook, one after another, until I could get the fire lit.  After that, it was relatively smooth sailing, and I made a dandy batch of biscuits from the 1908 Rumford Complete Cookbook (the recipe is below) which I shared with Rebecca Ressl, the volunteer who was coordinating the workshop, her son, and a couple of visitors.  I also wrote down a note to bring more matches, newspaper, and kindling.

    Equipping a museum kitchen into a functional one was an experience that required a long list, several large tubs, and about every 1920's-ish and earlier piece of cookware I could manage to stuff into them.  This sample will give you an idea: a sifter, rolling pin, measuring cups, enamel pans and enamel bowls of various sizes (every one I had), a hand egg beater, knives, cutting boards, cooking spoons, cast iron pans, soup pot, bundt cake pan, cooling rack, an oven thermometer (a critical piece of kit) and more.  I also brought all the ingredients for a meal of soup (Ukranian green borscht), biscuits, and coffee cake.  I even brought along a teapot and tea so we could have some tea while waiting for the coffee cake to bake.   

    Never let it be said that I'm not thorough.  Every plastic or modern item was squirreled away out of sight, so when the students arrived, they walked into a 1920's kitchen.  I had learned how to cook on a Victorian wood cookstove at a workshop held in one of the restored buildings at Old World Wisconsin, a much larger living history site, and I hadn't appreciated until the day of my own workshop the effort my teachers had put into turning the kitchen there into a working Victorian kitchen.  

    I must take a brief detour here.  Readers of this blog will know by now that I wear Victorian-style clothing much of the time.  Since Schumacher Farm has been restored to 1920, I had to update a piece of my wardrobe by about 30 years.  The 1920's are much more than flappers and women in long fur coats dangling cigarette holders that look like they're about two feet long.  There were plain old farm women, too, but compared to chic city women, photos of these average women were few and far between.


    I managed to find something approximating the period without having to have it made, and I found a reasonably accurate apron as well.  Rebecca Ressl dressed in period style as well, though her outfit was far more stylish than mine.  I've dressed in a lot of period clothing, but I think the 1920's has to be the height of dumpy fashion.  Unless a woman is tall and thin, everything looks like a potato sack.  Still, needs must. 

    The students arrived, and off we went.  There were six students: four adults and two children aged 12 and 14.  Counting Rebecca, there were eight of us in a kitchen that would have comfortably held three or four, and we spilled over into the dining room at some point.  

    I've never wrangled seven people in a kitchen before, and I began to feel a little bit like one of those cooking show chefs: "Chop this fine.  That's great."  "Beat the eggs a little more.  Excellent."  "We need more wood here."  "Where's the spinach?"  "Are the potatoes cooked yet?"  "What's the oven temperature?"  "Here, try this. You can do it." This last one was for one of the kids who had never lit a match before.  He was baffled.  It took him a few tries, but he managed it in the end, and now he has a skill he didn't have before.  Manual egg beaters also seemed to be something of a mystery.  
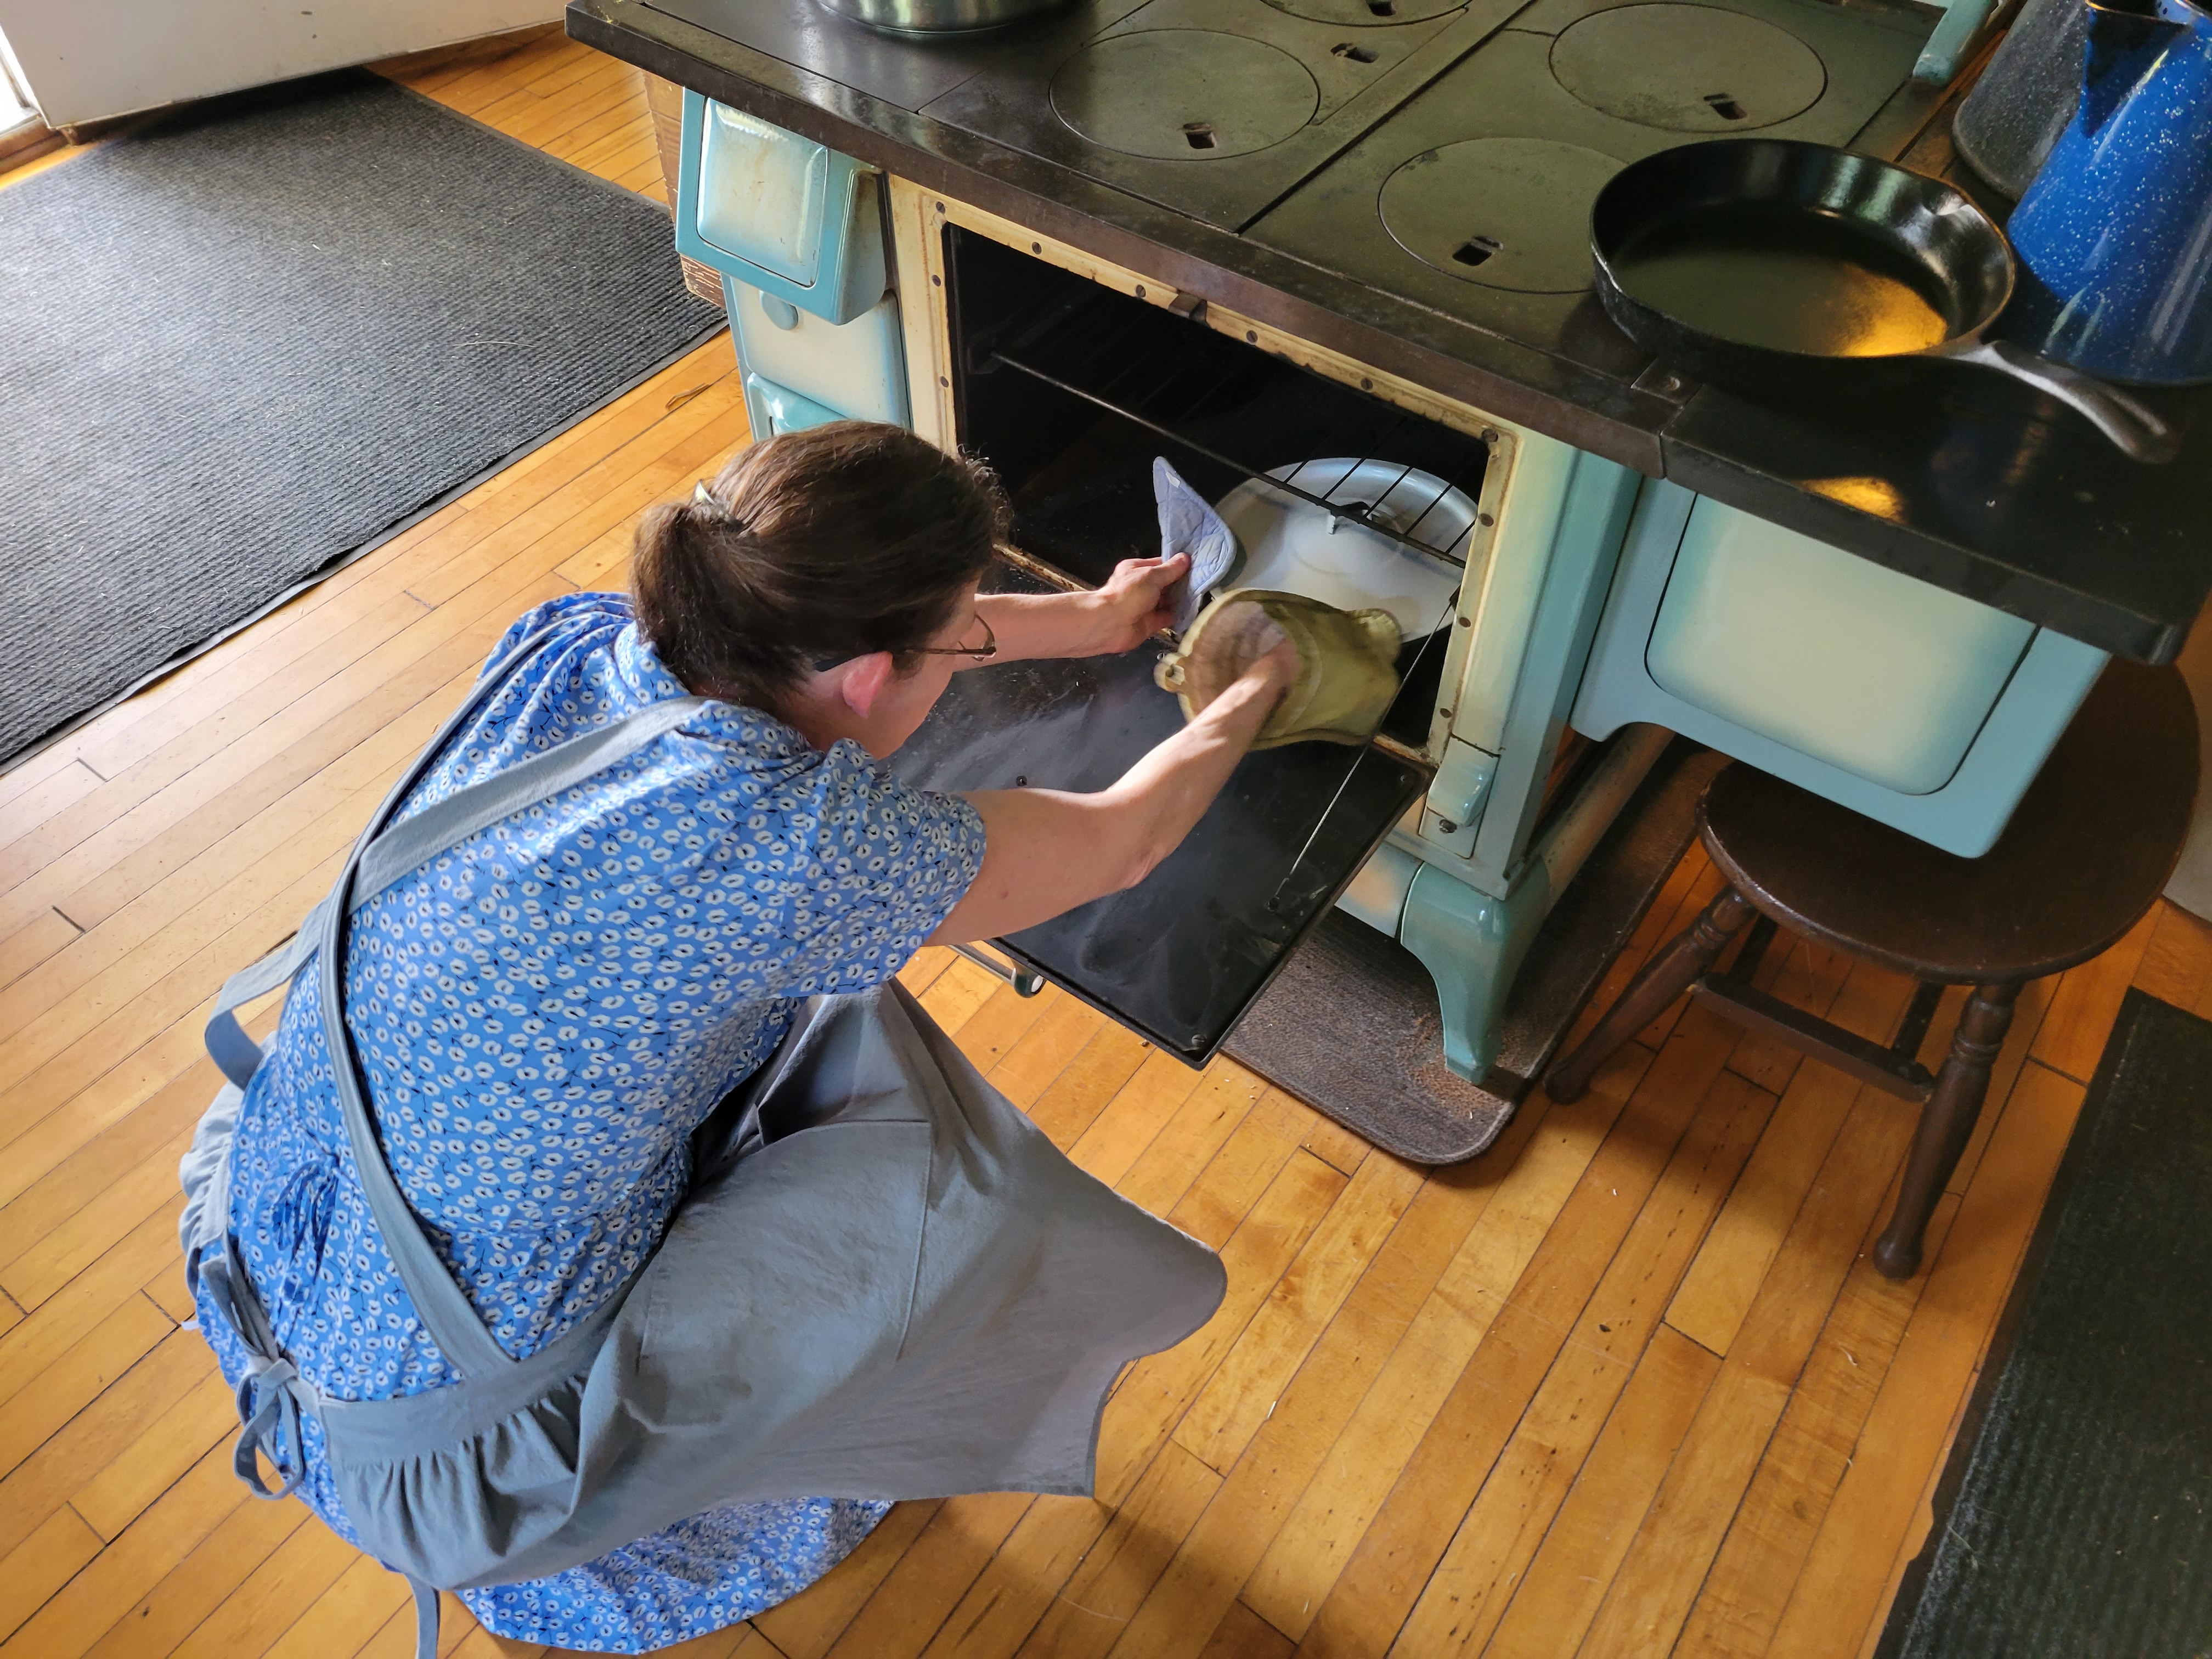
        As I mentioned earlier, that crack in the side of the woodstove affected the way the oven was going to work.  I had made a great batch of biscuits the week before, and I had tried the coffee cake in Milly, my own wood cookstove, with success, so I placed the coffee cake in the same part of the oven as in my own stove.  The sugar in the batter crystalized too quickly, leaving the outside of the cake overdone before the inside was completely baked.  The coffee cake was the only flop in the meal, but everybody loved it just the same.  It wasn't exactly burned, but it was much, much darker brown than it should have been.  Still,  it wasn't half bad, and it looks glorious in the photo.  

    And after we had chopped and beaten and stirred and sifted and kneaded and simmered and baked and fed the fire over and over, we sat down in the dining room to a real family meal served on china that was as close to 1920's style as we could make it.  It's moments like this that make living history come alive.  We sat around the big dining table, and everyone had something interesting to say.  We talked about where the children wanted to go to school and the pros and cons of electric cars (newfangled cars are eternal, be it horse and buggy or auto-mo-bile), and chickens and small farming and conscious living.  I felt like I'd been living in this house rather than just working in it for a day.

                                                       Lunch served family style in the dining room


        I will leave you with two recipes from the day.  The Rumford Complete Cookbook is fast becoming my "go to" cookbook for the late 19th and early 20th century in addition to the Fanny Farmer Cookbook 1896 Edition.   The biscuit recipe is from the Rumford Complete Cookbook, and it is, by far, the best biscuit recipe I've ever made.  The biscuits are light and fluffy, and they serve up beautifully hot out of the oven or warmed up the following day.  I even like them cold.  The coffee cake recipe is from the Richards House where we spent a weekend in April (see the April 2022 post "The Great Escape for that adventure).  

    I also learned an important lesson in baking: there really is a reason to sift flour.  It makes all the difference in how light the finished baked goods will be.   If you don't have a sifter, go get one.  You won't be sorry.  You can have my sifter when you can pry it from my cold, dead hands.


    Rumford Biscuits
(Page 116 of The Rumford Complete Cookbook)

(This recipe can easily be cut in half.  I used half milk and half water for the liquid, Clabber Girl baking powder, and butter, not lard.  I also didn't add in all the liquid at once but started with 1 1/2 cup of liquid and increased it in small amounts until the proper dough consistency was formed.)

                                2 quarts flour                        2 tablespoons butter or lard
                                1 teaspoon salt                     2 rounded teaspoons Rumford Baking Powder
                                            Milk, or milk and water, to mix (about 1 1/2 to 2 cups)

        Sit well together the flour, salt, and baking powder.  Rub in the fat as lightly as possible with the fingers, just working it until the fat is well blended with the flour.  Then mix to a very soft dough with the milk or milk and water, leaving this always as cold as possible.  Mix with a flexible knife (I used a dough blender/pastry cutter) in preference to either a spoon or the hand as the steel blade of the knife is colder than the spoon and also because it cuts and mixes the dough more thoroughly.  Turn the dough onto a well-floured board, and roll or pat it with the hand until about three-quarters of an inch thick.  Cut into biscuits and lay them, not touching each other, on a baking pan.  Bake in a quick oven (about 375 - 400 degrees on modern ovens) for twelve to fourteen minutes.
        The requirements for good biscuit are: 1.  A very soft dough, so soft as to be almost sticky; 2. Very little handling because  much manipulation destroys their lightness; 3.  A very quick oven.  If biscuits are not allowed to touch each other in the pan, they will be lighter and more delicate than when placed close together.

Sour Cream Cinnamon Swirl Cake

(recipe from The Richards House, Dubuque Iowa)


Note: The original recipe calls for 1 box Betty Crocker yellow cake mix.   This wasn't available in 1920, and it's got an alarming number of non-food ingredients.  I have substituted a recipe for a homemake yellow cake mix instead (see below) which is simple, tasty, and keeps well.  The directions indicate that the coffee cake should be baked in a bundt pan, which we have, but I'm not sure that's absolutely necessary, though the baking time may vary.


1 batch of homemade yellow cake mix (see recipe below)

4 eggs

1/2 cup sugar

1/2 cup brown  sugar

3/4 cup oil

1 cup sour cream

3/4 cup chopped nuts (optional - slivered almonds are divine)

1 Tbsp. cinnamon

1 tsp. vanilla (needed for homemade cake mix above)


Mix brown sugar and cinnamon in a bowl and set aside.  Generously grease a bundt pan and set it aside.

Mix together the homemade cake mix ingredients in a large bowl, adding nuts if desired.  

Beat eggs until thick and fluffy.  Add white sugar, vanilla, and oil and beat again.  Add sour cream and stir to mix well. 

Pour half the batter into a bundt pan, then sprinkle with brown sugar.  Mix in with a knife blade to form a swirl.  Pour remaining batter on top.  Bake at 350 degrees (a moderate oven) for about an hour.


Homemade Yellow Cake Mix (makes the equivalent of 1 box of Betty Crocker yellow cake mix)


2 cups all purpose flour

1 cup sugar

1 Tbsp. baking powder

1/2 cup non-fat powdered milk


Combine these ingredients and store in an airtight container.  It will keep well in the pantry for months.  When you use it, you will need to add 1 tsp of vanilla to the recipe as the recipe will assume that vanilla was included in the store-bought mix.


August - Peaches, Tomatoes, and Flax - Oh, my!     August this year seemed like a month suspended in time followed by an insane rush.  After...