Tuesday, December 29, 2020

Through the Grinder - A Recipe for Chicken Apple Sausage

(Vegetarian readers may want to try this recipe with firm, cooked beans such as Mayo Coba beans and an egg.)

    If you have ever bought chicken sausage at a market, you may be surprised, if not shocked, by the price.    The price for a 12 ounce package of chicken sausage links ranges from  $4.50 to $9.50 or more.  In addition to a steep price, the links are almost always stuffed into a "natural" casing, which is foodspeak for pig intestine - problematic for those of us who don't eat pork or other red meat.  The choice is to ignore it, try to take the sausage out of the casing and deal with it that way, or pass it by altogether.  In some brands, the ingredients contain "unpronounceables": preservatives and fillers galore. 

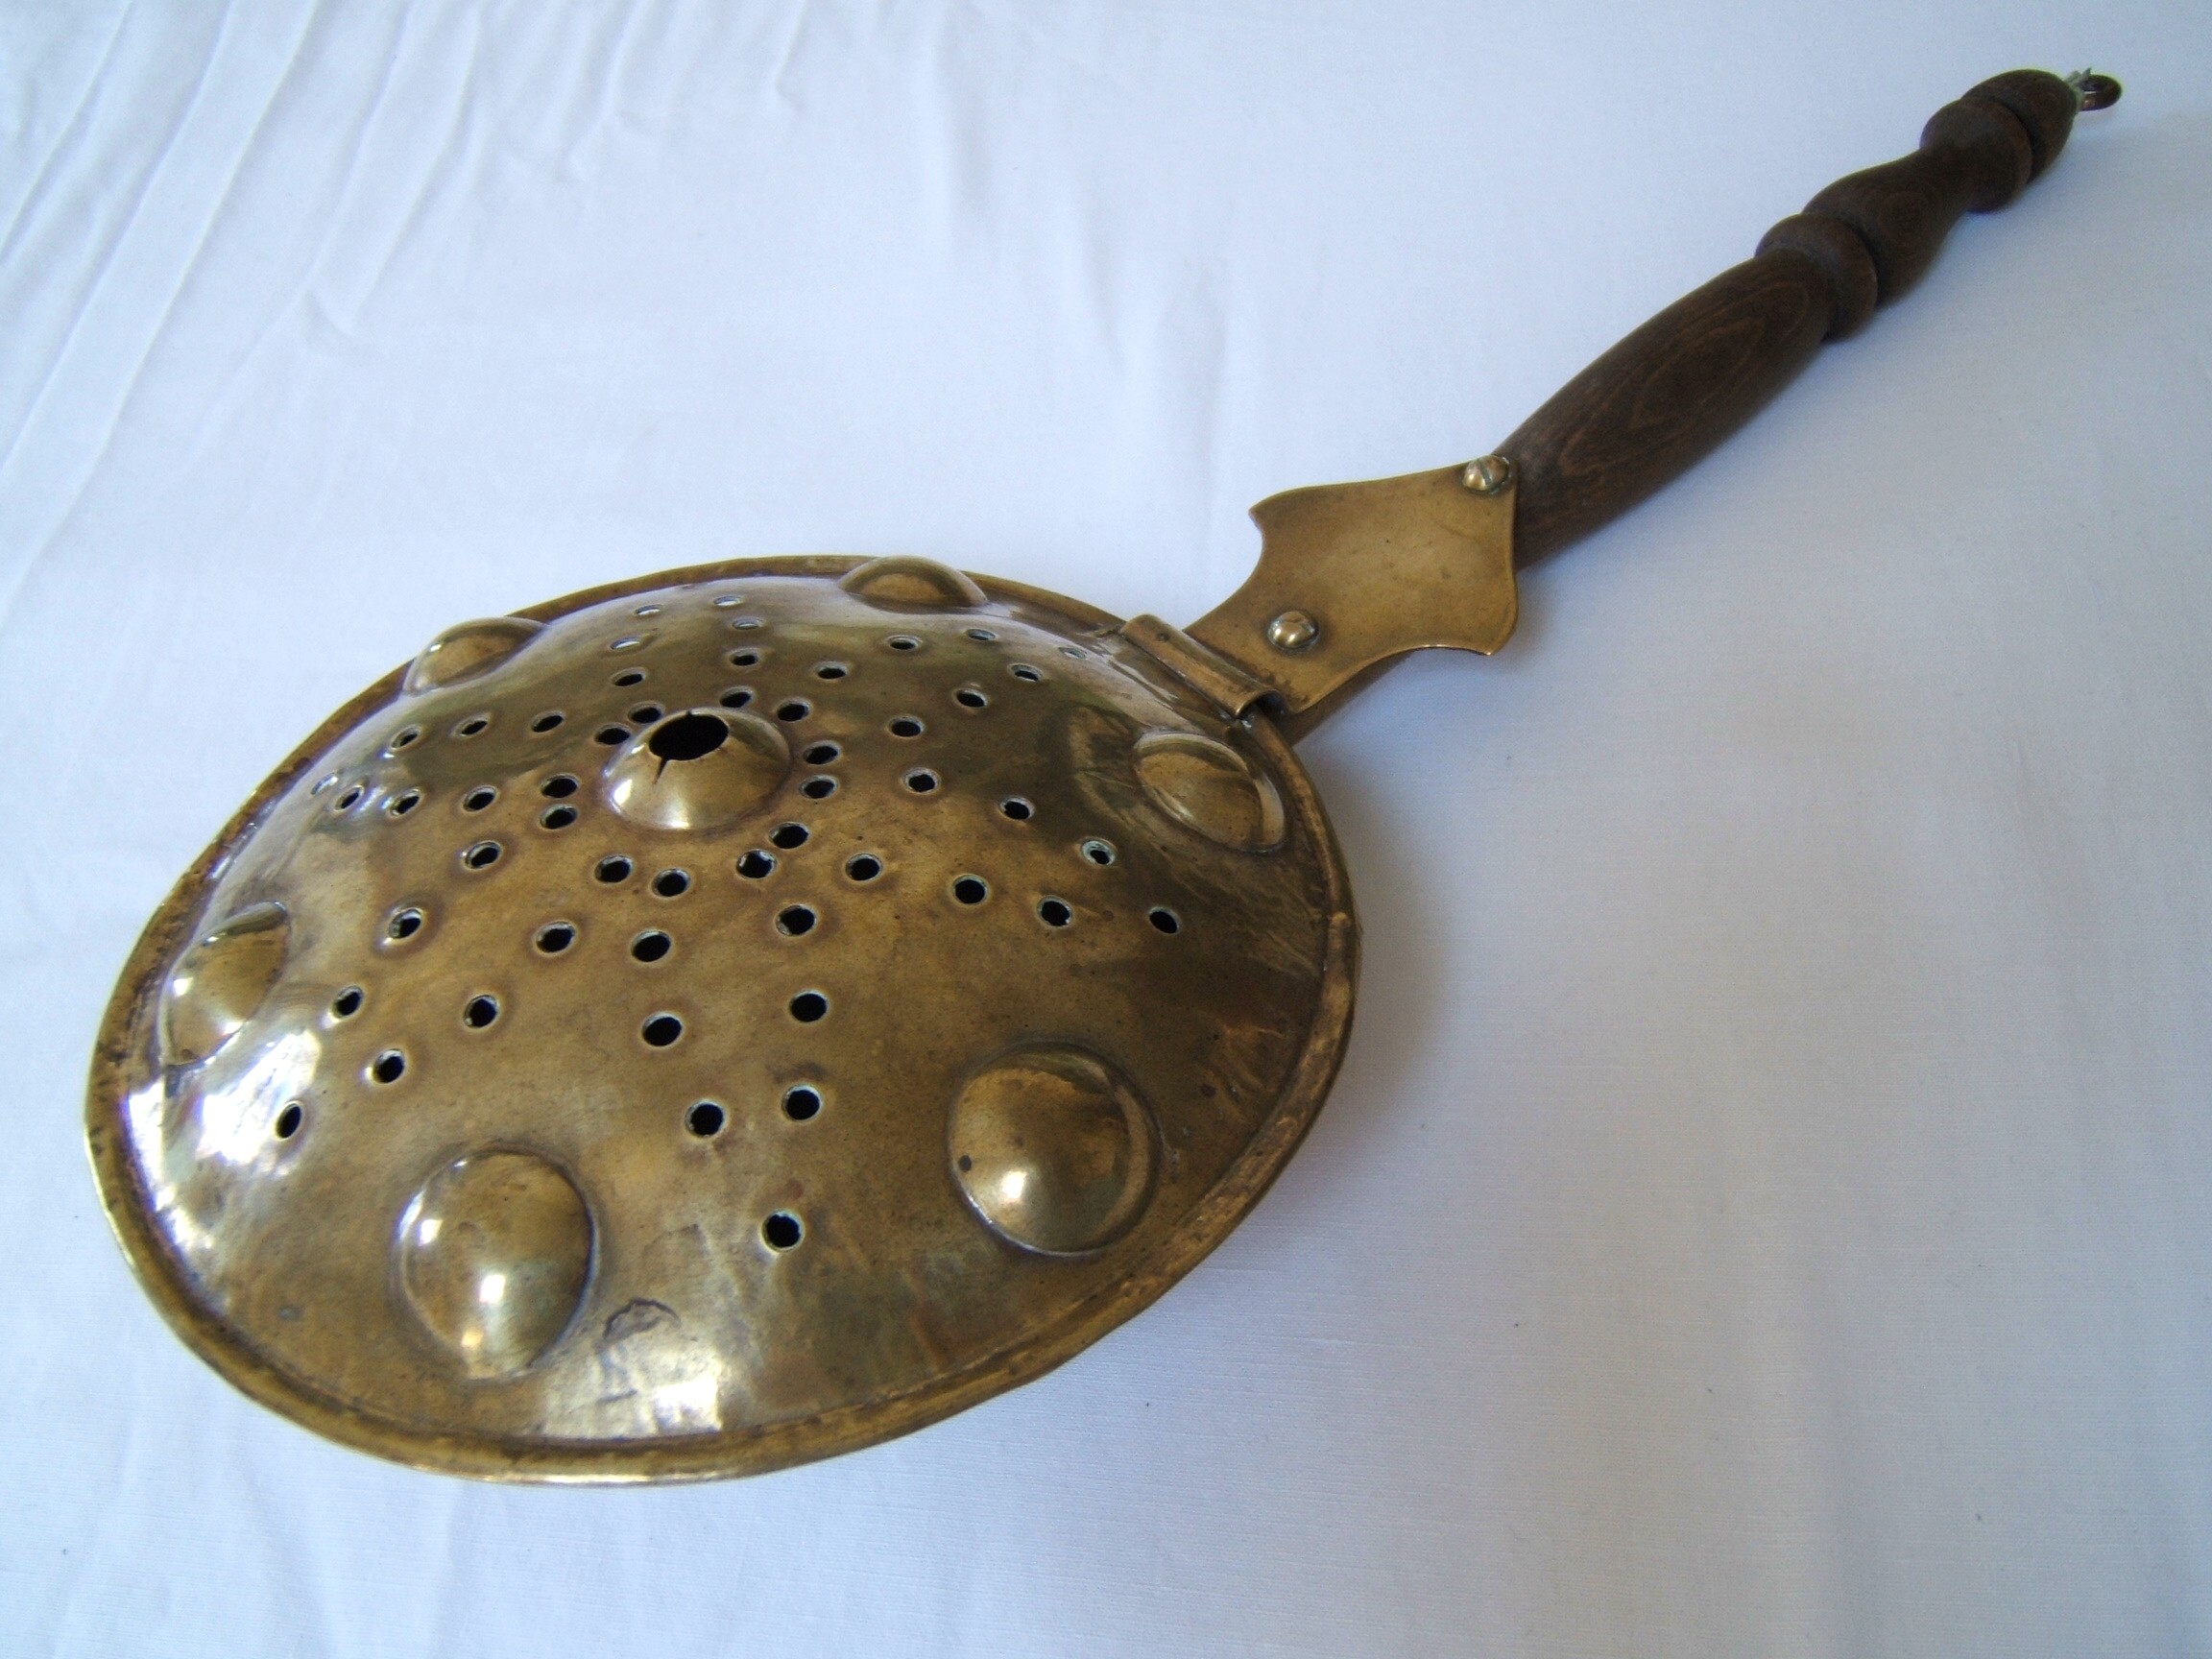
    Thankfully, the Victorians had a solution to this problem in the form of an everyday item that can be found in most antique stores at a very reasonable price: a meat grinder.  I was delighted to find one the other day for $10.00 and snapped it up to add to my growing collection of working Victorian kitchen tools.


    This is a Sargent Gem Food Chopper #20, patented April 26, 1899 and October 15, 1906.  I think that the 1906 patent is for the clamp assembly since that patent stamp is right next to it on the body of the grinder.  

    If you want to buy one of these, I have some recommendations for you: 

    Try to buy one that has minimal or no rust.  


You will want to find one that has this grinding blade on it: 


    Make sure it fits the grinder you are buying.  The one I bought had extra blades, but I found that these were for a Universal brand grinder, so they were useless on mine.  This

    I disassembled the grinder and gave it a thorough washing, using a steel wool pad to remove the few rusty spots. Then I gave the whole thing a very light coating of vegetable oil to keep any additional rust off and wiped the excess away with a paper towel (the towel went into the fireplace rather than being thrown out).  

    There are two good reasons that you want to use a hand grinder rather than a food processor:  (1) it uses no electricity and (2) if you try to grind your chicken using a food processor you will create a paste which will give your finished sausages the texture of sausage-flavored pancakes.  The grinder will give you the "meaty" texture you are usually accustomed to.

The Recipe (makes 6 large or 8 small patties):

    This recipe calls for one pound of boneless, skinless chicken thighs which you can find almost anywhere for about $2.00 per pound.  If you want to bone your own, you can find it for even less.  In that case, buy about 1 1/2  pounds to compensate for the lost weight due to the skin and bone which you will remove.


        1 lb. boneless chicken thighs, cut in chunks

        1 Tbsp. maple syrup

        1 medium, sweet apple skinned, cored, and grated (I used Honeycrisp) 

                If necessary, drain off most of the excess juice. 

        1/4 tsp. garlic powder

        1/2 tsp. salt 

        1/2 tsp. dried thyme (I used lemon thyme from our garden)

        1/4 tsp. dried sage or more to your taste

        1/4 tsp. poultry seasoning (Bells seasoning is ideal)

        1/4 tsp. fresh grated pepper or to your taste (I have a three pepper blend I enjoy)

    Preheat your oven to 425 F degrees (about 225 C).  Line a rimmed baking sheet with parchment paper and set aside.

     Clamp your grinder firmly to a sturdy surface. Place a shallow pan beneath the grinding opening (I used a pie dish). 

    In a medium bowl, mix the grated apple, maple syrup, salt, pepper, and herbs and set aside.

    Rotating the grinder handle slowly, add your chicken chunks a few at a time, moving the ground meat to one side of the dish below the opening to allow for more meat to be ground. 

    Add the ground meat to the bowl with the apples and spices and stir until just combined.  If the mixture appears to be a little sloppy, don't be concerned.  The sausages will firm up nicely when cooked.

    Using your hands, take a small handful of the sausage mixture, roll it into a ball, and place it on the baking sheet, patting it down to about 1/2 inch thick.  Continue until there are six to eight patties on the baking sheet depending on the size you want.  If you have any leftover sausage mixture, just dollop it onto any patties that seem a bit smaller than the rest to use up the remaining mixture, making sure to pat them down again to about 1/2 inch thick.  You don't need to worry about spacing the patties far apart: they will shrink during cooking.

    Bake patties for about 10 minutes then flip and bake another 5 minutes or so until cooked through.  If your patties are thicker, burger-sized patties, they will take about twice as long.  Patties will not be brown.  Drain off any fat and set aside to cool.  Refrigerate or freeze.  

    If you are cooking your patties in a wood cookstove like Milly here, remember to rotate your patties every so often and keep the oven door closed as much as possible to prevent heat loss.


    To finish cooking the patties, put them into a frying pan and brown them, adding a little water to the bottom of the pan to heat them first before browning if they are frozen. 

    Remember to wash the grinder thoroughly after use with hot water, making sure that all bits of meat have been removed from the interior and exterior of the grinder.  Do not put it into the dishwasher.  These grinders weren't made for this, and they may rust.  Dry all surfaces, then put a small bit of vegetable oil on a paper towel and cover all surfaces.  Keep your grinder in a dry place in order to avoid rust.

    This recipe is delicious, and the ingredients can be varied to suit your taste.  Add a little red pepper flakes to give it a kick.  Dump in some finely diced cranberries.  Use a tart apple instead of a sweet one.  Change the herbs to make them Italian or Mexican or whatever you like.  Add finely chopped onion or chives.  Enjoy your savings, and enjoy your sausage!


Wednesday, December 16, 2020

 Cold Feet

    I have cold feet in winter.  Really cold feet.  Most years I begin wearing two layers of socks sometime in late November and wear them right through until sometime in March.  This means that the shoes I wear in summer are too tight in winter, and my winter shoes are too large in summer.  

    Given what I've seen of Victorian shoes in antique shops, cold feet might have been a problem for Victorian women as well.  The shoes and lace up boots I've seen are far too form-fitting and the leather too thin to provide any real insulation from snow and ice.  Victorian women didn't stay indoors in winter lounging on fainting couches: someone had to go out to feed the chickens, go to work or shopping, care for family members, visit friends, and do all the things we do today without automobiles and computers.   

    In looking at a Sears and Roebuck catalog, the Amazon of its day, from the turn of the twentieth century, I found that there were boots called "bluchers" for streetwear during autumn and storm/skating boots for winter which were made from heavier leather and treated in order to make them waterproof.  Some of these winter boots had "invisible soles" made from cork which would have provided some insulation.  


    I've made do with kiltie-style paddock boots which are a pretty good substitute for the bluchers, and if I wear double socks, they're not too bad for Wisconsin winters as long as I don't trudge through deep snow or stay out very long.  Still, I suspect that Victorian women who really needed to be outside for long periods in cold weather just threw up their hands and their fashion sense and wore men's boots. 

    Keeping my feet warm in winter during the day is generally not a serious problem, with the exception of one day in February 2005 when I worked on a sheep shearing crew in below-freezing weather and processed 130 fleeces while standing on a hard-packed dirt floor.  It took an alarmingly long time to get the circulation back into my toes that night.  

    Nighttime is another story altogether for me and my feet.  Even with socks on, I have lain awake for hours waiting for my feet to warm up so that I can fall asleep.  And my feet can get cold in an instant.   I have tried every possible combination of taking off my clothes and getting into a nightgown or pajamas while saving my feet for last.  By the time I've taken off my socks and turned down the sheet, it's too late: cold feet. 

    Thankfully, the Victorians had a brilliant solution for that.  Two solutions, in fact: bed warmers and foot warmers.  

    You may have seen a bed warmer like this one in an antique shop. These have been in use for hundreds of years.


     Hot coals were put into the pan, and then the contraption was carried upstairs, smoking away, and shoved between the sheets of the bed.  While this would have warmed up the bed, the likelihood of scorched sheets and smoke infused blankets seems all but certain.  Since the person carrying the pan would have probably been holding an oil lamp or candle in the other hand, this poses any number of fire hazard concerns.


    A brick could be heated on the hearth or placed directly on the wood stove, then wrapped in a flannel and put into the bed.  This worked for centuries.  It wasn't comfortable, but it was cheap, and it worked.  It was certainly safer, though less decorative, than the warming pan.


    Americans used a novel, if potentially dangerous, device for heating chilly feet in carriages or in church.


     The little metal box was filled with hot coals, just as the bed warming pan was, and then popped into the carriage under a blanket or under the church pew.  With long skirts close by, the fire hazard does not even bear thinking about!  To say nothing of the mess of dumping the ashes.

   Another option was a slab of soapstone with a wire bail to carry it that could be put next to the hearth or on the wood stove in the same way as the old-fashioned brick and then carried to the carriage or bed or wherever it was needed.  Effective, but very heavy.  I mistook these for portable chopping blocks when I first saw them.

    None of these solutions, with the possible exception of the brick, was going to work well in our house.


     The late Victorians, however, came up with a simple, elegant, and effective solution: hot water bottles! 

    Many large wood cook stoves have a hot water tank on one side which heats the water when the stove is burning.  If a hot water tank was not available, a teakettle of hot water was always close at hand.  By the turn of the twentieth century, many homes in towns and cities had hot water taps fueled by coal or gas.  Rather than shoveling hot coals into a pan and trotting it around or lugging around a heavy, hot stone, you could use hot water and have these instead.


Harvest wove the beautiful blanket the hot water bottles are resting on.

    To the right of the pitcher of hot water is a stoneware foot warmer from Denby Pottery in England.  It has a screw cap on top and a knob on the front which allows it to be carried easily.  The stoneware allows the heat to gently penetrate to the surface, and the shape, with its flat bottom, is perfectly designed to rest one's feet on.  I've seen one reference to this shape as a "pig," which makes sense if you look at it.    

    The brass bed warmer on the far right heats up quickly when filled with hot water and slips neatly under the bedsheets.  I found it in an antique shop years ago, thought I'd lost it, and was in paroxysms of joy when I found it again.  I tried to use it as a foot warmer as well as a bed warmer, but the shape wasn't right for resting my feet on, and it was too hot to be so close to the skin, so I got the foot warmer as well.  This has turned out to my advantage as I can warm up the bed with the brass bed warmer while keeping my feet toasty on the pottery foot warmer.  


    The brass bed warmer has a two part screw cap with a vulcanized rubber gasket at the base of plug which fits under the top screw cap.  The ceramic foot warmer has a similar gasket on the screw cap as well.  


          These are two amazing pieces of Victorian kit, and I have no idea why they fell out of fashion and why I had to go through most of my life with cold feet because of it.  They don't use electricity.  They don't pose a fire hazard.  They are aesthetically pleasing.  They don't require special washing like modern electric mattress pads, and they won't wear out.  No more frozen feet in bed.  No more frozen feet while sitting in the bedroom chair reading next to the oil lamp at night.  Whatever did we do without these?  We had cold feet, that's what.


Sunday, December 13, 2020

Deck the Halls, and Walls, and Yard...


    This post isn't an example of low technology, but there is a good deal of Victorian charm in it.

    Wisconsin is a place that has weather with conviction.  When it rains, it really rains; when it's windy, it's really windy.  We have tornadoes, we have blizzards, we have ice storms, we have heat and humidity.  And it can all change in a moment, as you will see later in this post, as we prepared for Yule.

    I come from a family of determined excess when it comes to Christmas.  My father would set up the Lionel train below the tree, complete with "snow," bridges, miniature trees, and little glass bead ornaments in the open coal cars which made it even more wonderful to a child's eyes.  Setting up both the tree and the train was an intricate and delicate process involving a good deal of scrambling around below the tree and showers of needles everywhere.  In order to create the "perfect" tree for my mother, my dad would pirate extra boughs that were left lying about where we had cut the tree down, drill holes in the trunk of the tree, and insert them so that there would be no gaps between the branches.  It was a labor of love.      
  
    My mother was no less indulgent.  There were ornaments everywhere: in the pans of the big, brass scales, in large brandy snifter vases, and the tree literally sagged from the weight of the ornaments hung on it.  We had multiple strings of twinkle lights on the tree, and it was my job to string them "just so" so that they were evenly spaced throughout the tree, including in the interior branches.  If you are wondering if my family was creating something from a film set, you would be right: my dad was an actor and a screenwriter for CBS, so it made perfect sense to us.   My mother said that if you could still see the tree branches or a gap after you had decorated it, then you didn't have enough ornaments.  On the top of the tree was an angel my mother named Saint Omelette.  I have no idea why.  She seemed just fine to me.


    I brought this sense of aesthetic insanity right along with me into adulthood, and Harvest and I began to collect ornaments as soon as we could afford them.  Because she is sensitive to pine sap, I was in charge of setting up the tree, adding the lights, and decorating it.  My trees would have made my mother proud.  At one point there were nine strings of twinkle lights on a single tree, all numbered, with the end of one strand plugged into the next strand and only three plugs on the extension cord.  I was blissfully ignorant of the impending electrical fire hazard that loomed over us.  Why the house didn't go up in flames, I'll never know.  One year I set up the tree and decorated the whole thing, lights and all, during the night so that when Harvest came down the next morning that was the first thing she saw.  Our tree topper was a gopher hand-puppet ("Gopher") that had a wreath on its head and held the single white light on the tree in its paws.  Gopher was the only thing available to top our first tree when we were young and poor, and she has remained our tree topper ever since.  I suppose it's no stranger than an angel named Saint Omelette.

    When we moved to Evansville, Harvest began to decorate the front yard for Halloween and Christmas.  This year, because everything had been turned upside down due to COVID, Harvest decided that she wanted to create an event in the front yard for the holidays.  She usually does some decoration, but this year she went all out.  

    Harvest had made the Father Christmas figure with the sleigh pulled by corgis some years ago. 


All the corgis pulling the sleigh have antlers except for the "puppy" who is jumping for the Sun ball.


    This year Harvest created another cutout for the yard: a goddess figure with a solar hex sign in the center.  She is holding the Sun, and the sign on the frame above her says, "Light is Returning!"  She stands where the witch was at Halloween.  It was early December, and the season was turning, but no snow yet, just dry leaves on the ground.

    Meanwhile, I was working on decorating inside the house, one-handed, in a cast.  Instead of a tree, we hang decorated swags at the entrances to the parlor, middle room, library, and kitchen doorways.   After using real branches for a number of years, we decided to opt for artificial swags rather than real ones.  It just didn't seem right to cut down a lovely tree to be used by us for only a few weeks when it could otherwise be a refuge for birds and animals and add beauty to the land.  


 The view from the front parlor toward the kitchen.


The kitchen is not immune from decoration.


                                Nor is the bookshelf.

Nor is the chandelier.


    Our decorations include lots of suns and moons and delicate glass animals, vegetables, fruits, pine cones, and acorns - symbols of longevity and abundance.  There is always a pickle hidden in each swag for luck.  According to an article in Good Housekeeping,"During the 1880s, the department store Woolworths began selling blown glass ornaments imported from Germany, some of which were shaped like fruits and vegetables. Around that same time, a story began circulating that German people hung a pickle on their tree as the last ornament. The first child to find the pickle got to open an extra present. But when Americans checked in with the Old Country, most Germans had never heard of the tradition. Common wisdom has it that some savvy salesman made up the tale to sell more pickle ornaments, and if today's trees are any indication, it seems to have worked."

    Sadly, my decorating finesse was wanting this year with my hand in a cast.  I had no idea how fiddly the process of hanging ornaments one-handed was going to be, and I lost four lovely ones to the floor.


Yes, that is a potato on the left.


And a banana.
    
    
    And then suddenly the weather changed in the way only Wisconsin weather can.  After days and days of 40 degree temperatures, there was one day of 50 degrees when everyone rushed outside to enjoy the sunshine.  Just two days later, overnight, it looked like this:


From out of nowhere, six inches of snow.


        And yet, what a transformation it made.  


    This year there we will be quietly on our own, just the two of us, without our usual holiday tea party or Yule Pageant, but the spirit of Yule has finally arrived at our house with the snow.  Seven long nights until the sun begins to return, but we know it will.


Thursday, December 3, 2020

 Countdown!

    Christmas is a secular holiday in our house, as opposed to Yule, but we still enjoy decorating.  Harvest has always enjoyed advent calendars, and we have had several over the years.  Most years, we seem to be a bit late in getting these up, but this year Harvest got them up right on time.

    There are two countdown calendars: one for our corgi, Bear, and one for us.  Bear gets treats in his own special form of calendar.  This year Harvest made special gingerbread biscuits for him.


Harvest got out her bowls and started baking.  


The biscuits were cut out and put on parchment paper for baking.


Bear wasn't quite sure what was going on, but he seemed to know it had something to do with him and supervised the entire process. 


50 little biscuits waiting to be put in Bear's special calendar.  We each tried one.  They were tasty but very, very, very dry.  A crunch only a dog could love. 


    Bear has a countdown calendar suitable for any dog: a little slipper for each day.  The toe of each slipper forms a perfect treat pocket.  The string of slippers runs up the staircase, so he gets his treat before bed.  Unfortunately, because Harvest and I had each eaten one of the biscuits, he only got one biscuit on the 1st and 2nd, but he'll get two the rest of the days.  I don't think he's noticed yet.


    Harvest had an extra advent treat for the two of us.  We've had a little holiday countdown calendar on the wall for several years now, but this year she went one better: a tea and ticket calendar!  Each pocket holds a Plum Deluxe tea sachet for me and a lottery ticket for her.  She hasn't won anything yet, but there are still 24 days to go.


Day 1 tea was Tender Loving Care.  What a treat!

    And she's still decorating!


Tuesday, December 1, 2020

 Greatest Gizmo Ever!

    (This post was originally published in The Dancing Lamb Facebook page on September 27, 2020. It's such a great example of Victorian technology that it had to be included here as well.)

    I love hanging clothes on a clothesline. It's such an energy-efficient way of drying clothes, it's cheerful, and I think it makes the clothes easier to fold. I far prefer it to dragging clothes out of a dryer, dumping them in a heap into a basket and then hauling the whole thing upstairs to fold.
    We have a pretty nice set up at the moment - two heavy T posts set about 35 feet apart with a total of six heavy gauge wire lines strung between them. I've hung washing on them, but dragging the clothespin bag along and running back and forth to the basket or hauling it with me is tiresome. There had to be a better way. I found it, not surprisingly, in Amish country.
    Harvest and I went to Cashton, a large Amish area about 2 1/2 hours away, for a day trip earlier this summer (masked and socially-distanced). There is an Amish-owned clock repair shop there I had visited before with wonderful, hand-wound, new and restored antique clocks. I had been hankering after one of them for a good two years. In addition, there are things we use on a daily basis that Target doesn't have but the Amish do, and it's a truly beautiful area, so off we went.

    While we were driving on back roads past Amish farms, I noticed that a lot of families had laundry lines that were on pulleys.

I'd seen something like this in films set in New York City or Boston or wherever, strung between apartment buildings, but I'd never really thought about them. They were just set dressing to me, and I had no idea how they worked. As we pulled into the driveway of the farm where the clock shop was, the women of the household were hanging out laundry on one of these pulley systems. The laundry line stretched at least 60 feet in a gradual incline from the back of the house toward the top of an outbuilding nearby, crossing over the dirt driveway as it did so. It was a hot day, and the women stood in the relative shade of a small grassy area with trees at the back of house to hang the laundry out. One after another, pieces of clothing inched their way from the pulley at the bottom toward the pulley at the top. There was no running back and forth, no dragging of baskets. It was brilliant.


One of the clotheslines I saw that day stretches from the house to the top of a silo!

    After a little research, I decided to take down one of the wire lines on my clothesline and replace it with a pulley system as an experiment. This is the website where I found all the directions to set it up:
https://www.practicallyfunctional.com/diy-pulley-clothesline/

Clothesline spacers

Clothesline pulley with carabiner to attach it to T posts


    I don't know how I got along without one of these. It was a bit of faff and work to get it set up the first time because I didn't know what I was doing, but the second and third lines went up in a jiffy. The most frustrating part of the whole thing was threading the clothesline through the tightener. I found that wrapping the last four or five inches of the clothesline in heavy duty packing tape, extending that a few inches beyond the end of the line, and twisting it into a point makes it possible to do this with a minimum of swearing.     


The all-important line tightener. Pull the end of the line toward the knot to tighten the line.

    This is the best gizmo ever! Those Old Order Amish gals know a thing or two about laundry! You stand in one place with your clothespin bag hung on one of the carabiners or wherever you like with your basket at your feet, and you just run the line away from you putting clothes on the line as you go and using a spacer every 8 - 10 feet or so to keep the line from sagging too much. No more trudging up and down the line dragging the clothespin bag and a basket of wet laundry along. When the clothes are dry, you pull the line back toward you, take the clothes off, fold them, and put them in the basket right at your feet. If you're clever, you can sort your clothes as you hang them so pants are in one section, shirts in another, "unmentionables" in another, and so on. The photos below show just one line, but I liked it so much, I now have two more: one line for my clothes, one for Harvest's and one for household items like sheets and towels (very handy for hiding those "unmentionables" from view). 


     There is a bit of an art to using a system like this, as is the case with most domestic tasks that seem simple at first but actually require some thought. I started out with three line spacers for our 35-foot line and found that I needed more, so now I have enough for four per line. How far apart you need to place them depends on what you're hanging: lightweight clothes can have spacers farther apart because the line won't sag as much under the weight; jeans and heavy towels will need spacers closer together. The line sag is minimal if the pulley system is hung at an angle, but I don't have that kind of set up, so I do get a bit of sag, which is to be expected.  
    I'm not sure yet about hanging the clothes out this winter. I wondered how our local Amish families do it, and I saw that there were footprints in the snow back and forth where their laundry lines were, but I'm not sure if anyone uses a pulley system in our area: I've never seen one here. I don't know how long it would take to dry the clothes in our Wisconsin winter. Amish families hang their clothes out year round, but how do they get the clothes dry before they just freeze rather than drying? Apparently, freeze dried clothes are incredibly white and clean. And probably stiff. Very stiff.  Maybe it's best to use the lines in the basement.

August - Peaches, Tomatoes, and Flax - Oh, my!     August this year seemed like a month suspended in time followed by an insane rush.  After...